Getting started with WPEForm form builder is very easy. You can watch the video above to get started in less than 10 minutes. Also you will learn various parts of the form builder interface. Please read on for more in-depth guide.
Create a form
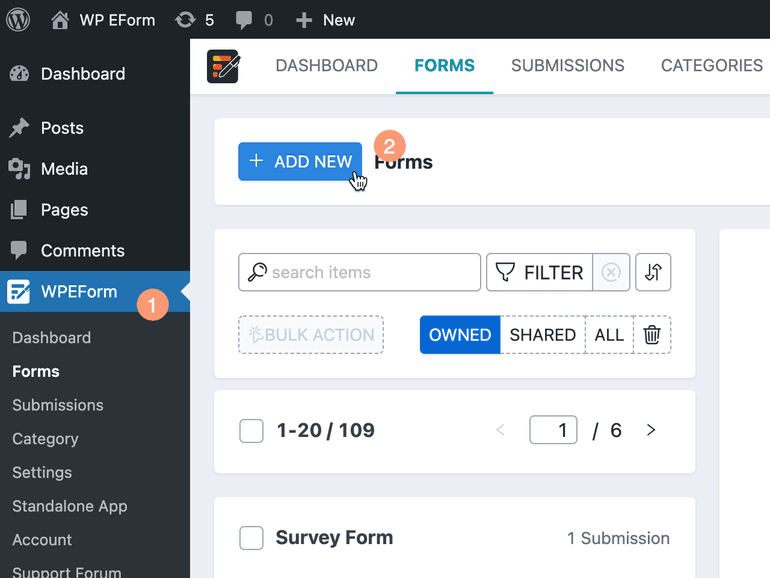
Easiest way to create a form is go to your WordPress dashboard, navigate to WPEForm Forms. From there click on the Add New button.
This will present you a setup wizard. You have three options:
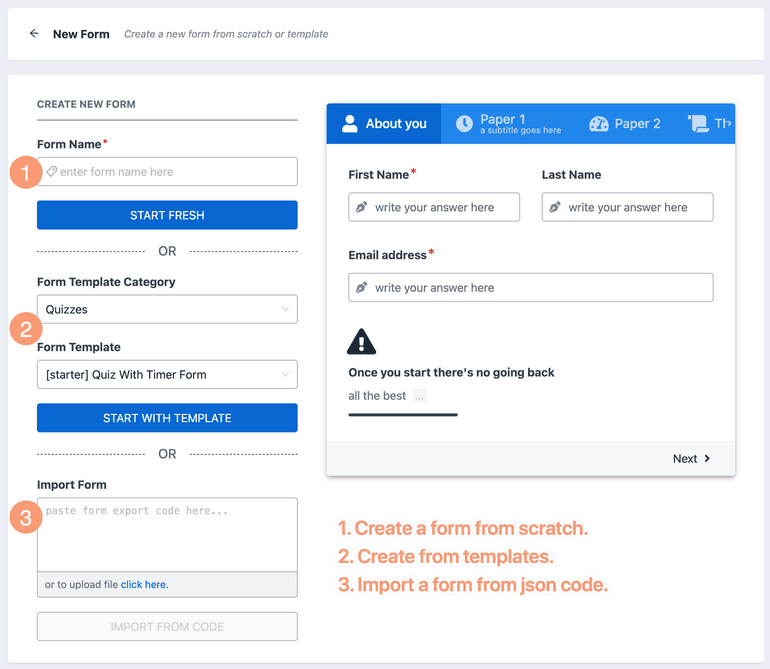
- Start fresh: where you create a form from scratch.
- Form templates: where you choose from presets.
- Import: where you import any export code (json files) of a form. Visit our example page to download a sample form.
Form Builder interface
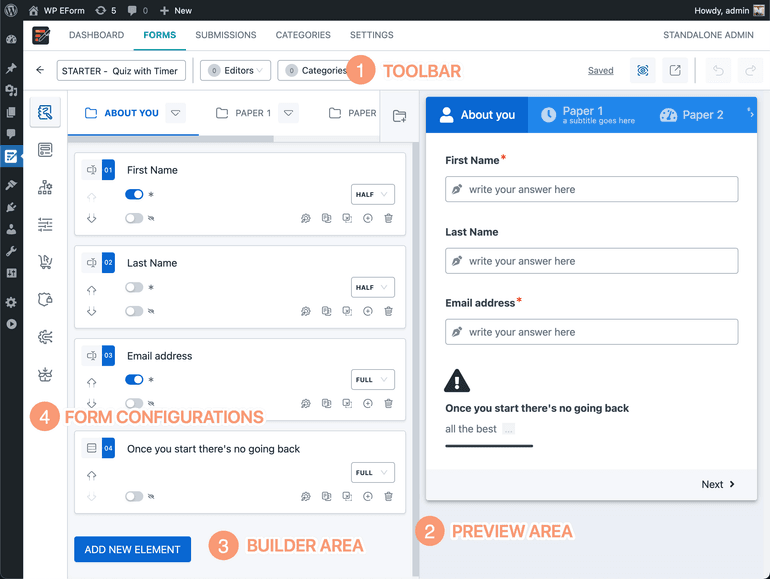
The image above shows various parts of the form builder.
- Toolbar: Set form name, set editors, categories etc. Where it says Saved, you can hover and configure the Auto Save feature.
- Preview area: See your form live on the right hand side. This shows up only on Desktop devices.
- Builder area: This is where you modify your form.
- Form configurations: On the left sidebar, you have access to various form configurations. More on this later.
Auto-Save and Preview
From the top toolbar, you can change the name of the form. Apart from that, you also have access to the form Auto-Save and preview functionality.
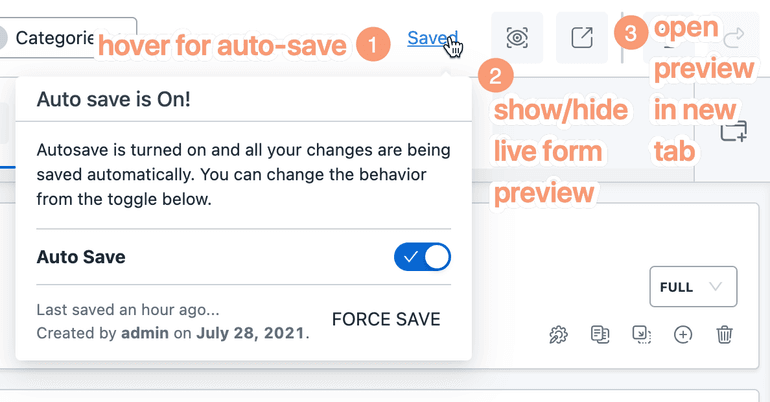
By default, auto-save is turned on. This will save the form, when-ever you make any changes. You can disable it, by hovering on the Saved text and turning off the auto save toggle.
If you disable the auto-save functionality, you will be responsible for saving your form by clicking the SAVE button. If you fail to do so, your data will be lost.
If for some reason, the form skeleton doesn't work or the form wasn't saved, you can also click on the FORCE SAVE button to save the form data forcefully.
In default configuration, form preview is shown right along-side the builder. You can hide it, by clicking the Live Preview(button number 2) button.
You can also open the form preview in a new tab, by clicking the third button as shown in the image.
If you've opened the form preview in a new tab, as long as you don't refresh the current or preview tab, any changes you make on the form, is shown immediately on the preview tab. You do not need to refresh the preview tab manually.
Adding Categories to Form
Forms can have any number of categories.
- You can filter forms under WPEForm Forms, with categories.
- In User Portal page, your users can filter their submissions by the categories you've assigned.
- In WPEForm Submissions, you can filter submissions by categories.
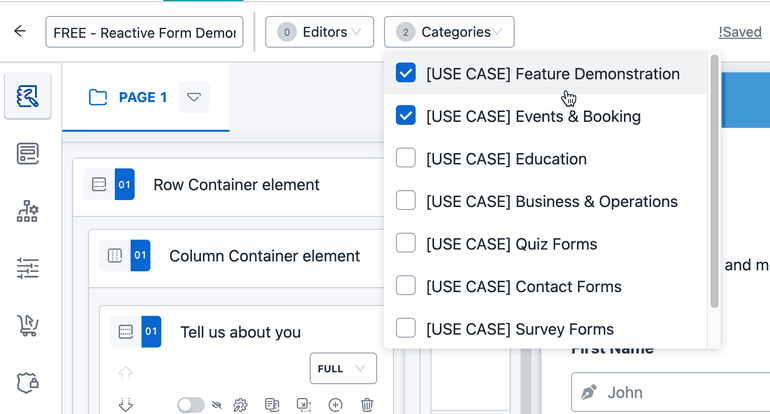
Under the toolbar, click on the Categories and select all the categories you want to assign. Please continue reading on managing categories to learn more.
Adding Editors to Form
By default, WordPress administrators can access forms created by all users. But WordPress editors can access forms created by themselves only. If you'd like to share your forms with an editor, then click on the Editors menu and select the WordPress user with whom you'd like to share the form with.
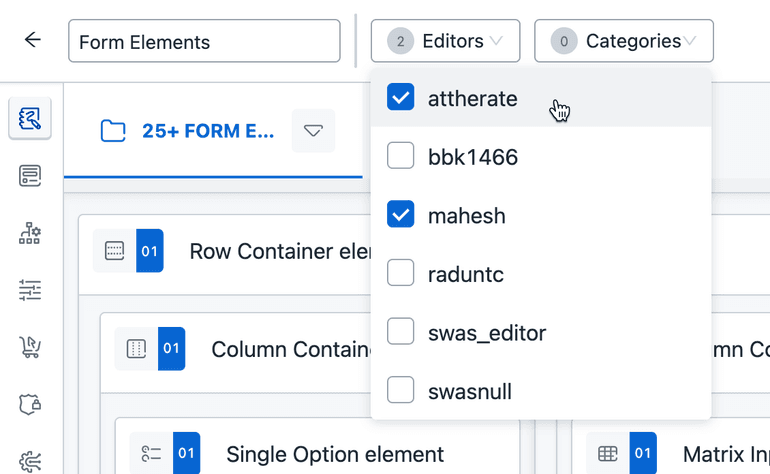
Once shared, the editor user can
- Visit and edit the form from WPEForm Forms Shared.
- Manage submissions of the form.
Form Configurations
The first tab on the left sidebar is where the form builder is. The rest of the tabs are for different kinds of Form Configuration.
It is split into 7 sections:
- Design & Behavior - This is the page from where you change how your form looks and behaves. Detailed instructions can be found under Design & Behavior section.
- Logic - Apply conditional logic to the form. Please see Conditional Logic section for more information.
- Settings - General form settings can be changed from here. Includes, notification settings, user data and more.
- Payment - Payment related configuration can be changed from here.
- Permissions - Set up how the form can be accessed and what kind of limits to impose. Please see Setup Limits for more information.
- Integrations - Setup third-party integrations like MailChimp, Zapier etc.
- Pool - This is where your unused elements live. When you delete a container element, all children end up here. You can also manually add inactive elements in this area. Read more about it here.
Adding Elements and Pages
When you open a blank form, one page is added for you. You can start by clicking the ADD NEW ELEMENT button and add the form elements you want.
Please read the relevant documentation for learning about pages and elements.
- Working with pages - Learn how to manage and add pages.
- Working with elements - Learn how to manage and add form elements.
Please continue reading the next chapter to learn about managing pages and elements.